Raspberry Pi Image: Difference between revisions
| Line 125: | Line 125: | ||
First make sure the Cumulus MX service is stopped |
First make sure the Cumulus MX service is stopped |
||
sudo systemctl stop cumulusmx |
|||
Then path to the Cumulus folder and start it |
Then path to the Cumulus folder and start it |
||
cd /opt/cumulusmx |
|||
sudo mono CumulusMx.exe |
|||
=== Symbolic Links === |
=== Symbolic Links === |
||
Revision as of 22:32, 29 October 2020
Using the pre-built Raspberry Pi Image
We have created an customised version of the Raspberry Pi Lite image with Cumulus MX pre-installed and ready to go.
This is designed to be what is called a "headless" installation, that is you can run it on a Raspberry Pi without a monitor or keyboard attached to it. As such the image does not contain a GUI, it is a command line only installation.
Pre-Installation Steps
You are going to need:
- A suitable SD card for your Raspberry Pi
- A minimum size of 16GB is recommended. Be sure to buy a good quality card.
- An image installer to copy the image file to the SD card
- The Raspberry Pi site has a list of suitable software for your operating system. Scroll down to "Writing the image".
- This guide with use Raspberry Pi Imager
- The image file to install
- Download the latest image file from here: rPi Cumulus MX 3.9.0.
- An SSH terminal program to configure your Raspberry Pi
- For Windows we recommend using PuTTY
- A file transfer program - though you will not need this right away, you will need it at some point. The main uses will be...
- Copying Cumulus MX updates to your Raspberry Pi
- Extracting the diagnostic files from Cumulus MX if this go wrong
- Setting up a web site
- A popular program for Windows is WinSCP
Installing the Image
This installation was performed on a Windows computer using the Raspberry Pi Imager v1.4 software
- Insert your blank SD card into your computer - if not blank whatever is on the card will be erased.
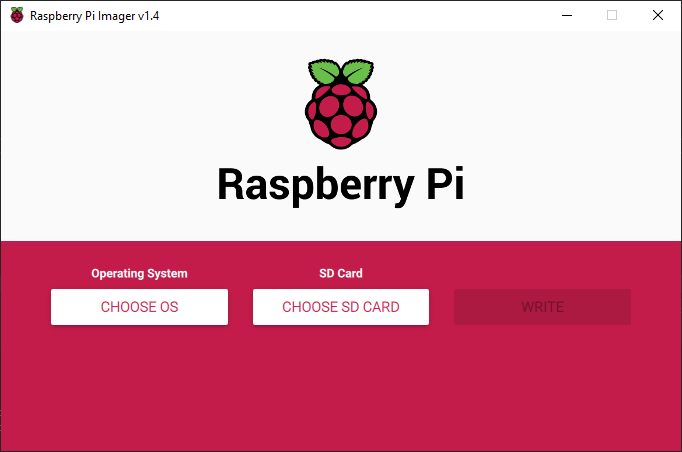
- Start Raspberry Pi Imager
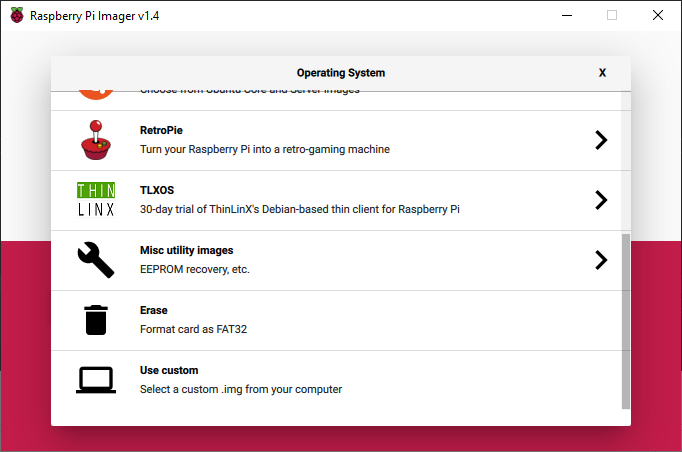
- Click the CHOOSE OS button, and select Use custom
- Browse to the location of the OS Image zip file you downloaded - no need to unzip it
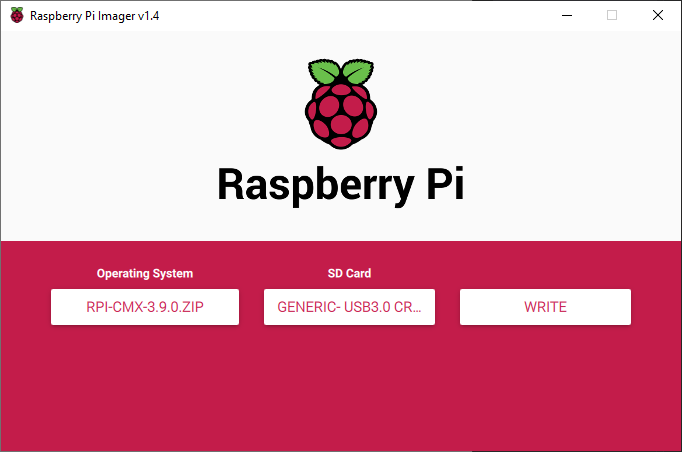
- Click CHOOSE SD CARD, and select the SD card from the Device dropdown - check you have the correct drive selected!
- Click the WRITE button. Writing the image will take a few minutes
- Once the image has finished been written, you can close Raspberry Pi Imager
- Click the CHOOSE OS button, and select Use custom
- OPTIONAL - If you wish to connect your Pi to the network using WiFi from the first boot, then you will need to follow these additional steps.
- Note. If you connect via an cabled network, you can always configure the WiFi later using the command line
- Eject your SD card from your computer and re-insert it
- Locate the SD drive in File Explorer.
- On the SD drive edit a file called wpa_supplicant.conf.txt with a text editor and...
- Change the country code to match your location - eg. US, GB, FR etc
- Set the ssid to match your WiFi id
- Set the psk to your WiFi password
- Save the file, and then rename it to wpa_supplicant.conf - i.e. remove the .txt file extension
- Eject the SD card from your computer and insert it into your Raspberry Pi
First Boot
- Connect the Pi to your wired network if you did not configure the WiFi as per the steps above.
- Power on the Pi.
- Now wait 5 minutes. The first boot will be resizing your disk and optionally configuring your WiFi
- Start your browser and see if you can connect to this URL: http://cumulusmx:8998
- If you can great - you should now see the Cumulus MX console
- If not, then you will have to find out the Raspberry Pi's IP address from your router. Then try connecting to this URL: http://<ip_address>:8998
Verify your SSH Connection
- Fire up your SSH Client - we use PuTTY here
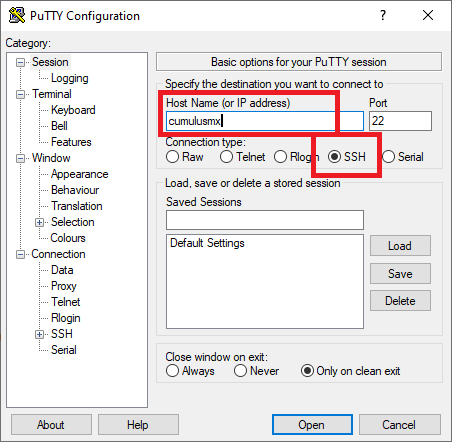
- Enter the hostname as "cumulusmx", and check the protocol is set to SSH. Then open the connection.
- Enter the hostname as "cumulusmx", and check the protocol is set to SSH. Then open the connection.
- (You can use the IP address instead of the hostname if that does not work)
- You will have the accept the SSH key the first time you connect
- Enter the username "pi" and password "raspberry" - these are the default Raspberry Pi username credentials
- When you login it will display a warning about you using the default password and ask you to change it
- Use the passwd command to do this now...
pi@cumulusmx:~ $ passwd
Changing password for pi.
Current password:
New password:
Retype new password:
passwd: password updated successfully
- Check the status of the Cumulus MX service with the command sudo systemctl status cumulusmx
- You will get some information back, the important bit to note is the line starting Active:, it should say active (running)
- You can leave the SSH session open, you will need it again soon...
Configure Cumulus MX
Now it is time to configure Cumulus MX for your station.
- Start your browser and connect to the same URL as before - http://cumulusmx:8998
- From the menu select Settings | Station Settings, then follow the guide on [this page?] for configuring your station
- Once your have completed all the settings for for station, and successfully saved them, Cumulus MX will need to be restarted.
- Back in your SSH session, send the command sudo systemctl stop cumulusmx, this stops the Cumulus MX service.
- Wait a few seconds, then enter the command sudo systemctl start cumulusmx, this starts the Cumulus MX service again.
- Back to your browser and check that URL - http://cumulusmx:8998 - again. If all is well, the default dashboard page should start showing the data from your weather station.
- If it does, congratulations, you have successfully started recording your weather data
- If it doesn't, then check back over this process carefully for any mistakes or omissions you may have made.
- If you cannot resolve the problem, then ask for help on the forum
Additional Steps
To be expanded
- Configuring WiFi from SSH
- Stopping Cumulus MX starting up when the Pi boots
- Give your Pi a fixed IP address
- Add a DHCP reservation
- Assign a static IP address
Information
Install location
In this image Cumulus MX is installed into /opt/CumulusMX
Image Customisations
- Full install of Mono
- Update of all packages
- Install of Cumulus MX
- Set Cumulus MX to auto-start
- Enable SSH service
- Disable IPv6
- Set hostname to "cumulusmx"
systemctl commands
You can use the following commands to control Cumulus MX...
- To start Cumulus:
> sudo systemctl start cumulusmx
- To stop Cumulus:
> sudo systemctl stop cumulusmx
- To check if Cumulus is running:
> sudo systemctl status cumulusmx
- To restart Cumulus:
> sudo systemctl restart cumulusmx
- To make Cumulus start at system boot time:
> sudo systemctl enable cumulusmx
- To stop Cumulus starting at boot time:
> sudp systemctl disable cumulusmx
Starting Cumulus MX from the command line
You may want to start Cumulus from the command ine for diagnostic purposes, you can still do this...
First make sure the Cumulus MX service is stopped
sudo systemctl stop cumulusmx
Then path to the Cumulus folder and start it
cd /opt/cumulusmx
sudo mono CumulusMx.exe
Symbolic Links
The image contains a number of precreated symbolic links for Cumulus MX files such as realtime.txt and the standard website tmp files. These links divert these files to a memory disk to reduce wear on your SD card.
Build Creation Notes
- Installed Raspberry Pi Buster Lite (August 2020)
- Enabled SSH
- Installed latest updates - apt update/upgrade
- Installed latest Mono complete stable version (6.12)
- Clean up apt - apt autoremove
- Changed hostname to "cumulusmx"
- Edited cumulusmx.service and copied to /etc/systemd/system
- Disabled mono-xsp4 service - update-rc.d mono-xsp4 disable
- Copied CMX to /opt/CumulusMX folder
- Created symbolic links for temp files to /run/cumulusmx
The following commands are useful in creating the image file (created on Debian).
Create image file from SD card - sdb, may be sdc etc.
dd if=/dev/sdb of=/home/<username>/rpi.img bs=1M
Shrink the image file.
Download pishrink from:
wget https://raw.githubusercontent.com/Drewsif/PiShrink/master/pishrink.sh
Then run it...
pishrink.sh /home/<username>/rpi.img /home/<username>/rpi2.img
Disable IPv6
Edit /etc/systctl.conf
Add line...
net.ipv6.conf.all.disable_ipv6 = 1


