Screen capture: Difference between revisions
m (Added a few other screen capture tools) |
|||
| Line 6: | Line 6: | ||
There are far better tools available |
There are far better tools available |
||
==Windows 7== |
==Windows Vista and 7== |
||
Within Windows 7 there is a 'Snipping Tool'. It is very basic but gets the job done. |
Within Windows Vista and 7 there is a 'Snipping Tool'. It is very basic but gets the job done. |
||
Click Start, Programs, Accessories and Snipping Tool. |
|||
| ⚫ | |||
(If snipping tool is not on your system, Open ''control panel'', click ''Programs and features'', click ''Turn windows feaures on and off'', look for ''Tablet PC Optional Components'' and tick it). |
|||
| ⚫ | |||
Click File, Save As -- make sure your file format is PNG or JPG as these are the best options for saving. |
Click File, Save As -- make sure your file format is PNG or JPG as these are the best options for saving. |
||
Attach the file to your post in the forum. |
Attach the file to your post in the forum. |
||
| ⚫ | |||
[[File:SnippingTool-example.PNG|200px]] |
[[File:SnippingTool-example.PNG|200px]] |
||
| ⚫ | |||
==Greenshot== |
==Greenshot== |
||
Revision as of 17:17, 29 November 2012
Capturing a copy of what is displayed on your screen can often help others to understand something you are discussing. A great example is when using the Cumulus Support forum -- if you have a problem with Cumulus, rather than simply trying to explain the issue, take a moment to capture your screen, or an element of it, and show this as part of your post on the forum.
All versions of Windows have very basic screen capturing built in. It works well however has limited features. Simply press the Print Screen button (usually top right of the keyboard). This takes a copy of the entire screen and places it in your clipboard. You can then paste this into something (MS Paint, Word, etc) and save it. Pressing Alt & Print Screen captures the active window only.
There are far better tools available
Windows Vista and 7
Within Windows Vista and 7 there is a 'Snipping Tool'. It is very basic but gets the job done.
Click Start, Programs, Accessories and Snipping Tool. (If snipping tool is not on your system, Open control panel, click Programs and features, click Turn windows feaures on and off, look for Tablet PC Optional Components and tick it).
Once loaded, highlight an area of the screen you are interested by holding down your left mouse button. Release the button and the image will appear in the Snipping Tool. You can do basic annotation such as adding a line, or use the highlighter to emphasise an area. Click File, Save As -- make sure your file format is PNG or JPG as these are the best options for saving. Attach the file to your post in the forum.
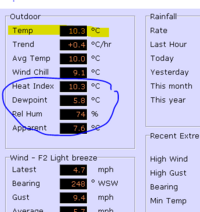
An example of the output using the two annotation techniques -- a pen (to draw the blue area) and the highlighter.....
Greenshot
One of a number of available tools for screen capture, this is very simple, effective, and free to use. This is a great all rounder for any version of Windows.
Download from http://getgreenshot.org/ and install. Once installed, press Print Screen to select an area; Alt & Print Screen for an active window. When the captured image appears use the left toolbar to annotate. Add text, circles, arrows, etc. Use the 'crop' option on the toolbar to reduce what has been captured -- you do not always need to show the whole screen. Click File, Save As and a file type of PNG or JPG -- attach the saved file to your forum message
A far more accomplished tool to get your message across.
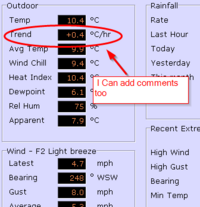
Example screen capture with an ellipse, some text and an arrow.....
Other Screen Capturing Tools
Free

